Cisco SDM uses wizards to help network administrators ease the basic tasks when configuring a router. So it really simplifies many of the command lines you are learning for your CCNA certification. With Cisco SDM, you are able to easily configure basic router functions, such as IP address assignments, interface configurations, authentication, NAT, DHCP, as well as more advanced tasks, such as VPNs, Firewall and ACLs, Routing features, Intrusion Prevention System (IPS), Quality of Service (QoS). All these tasks and many more can be configured directly from SDM using its intelligent wizard-based system.
Before we configure a static route with SDM, we must first perform the initial configuration on a router required in order to be able to use SDM. Recalling from the previous lesson, we must configure the router to run a web server, define a username and a password with privilege level 15 and enable telnet and ssh transport in VTY lines.
Router(config)#ip http server
Router(config)#ip http secure-server
Router(config)#ip http authentication local
Router(config)#username ciscokits privilege 15 secret ciscokits
Router(config)#line vty 0 4
Router(config-line)#privilege level 15
Router(config-line)#login local
Router(config-line)#transport input telnet ssh
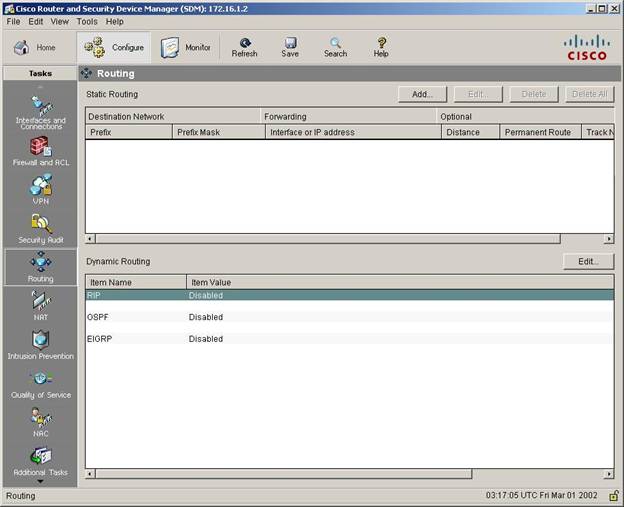
Now, we are ready to start Cisco SDM. After the Cisco SDM Java applet is loaded, go to the configure screen, then to the Routing section in the left column.

As you can see, here you can define static routes, as well as enable dynamic routing protocols. Since we want to add a default route, we have to use static routing.
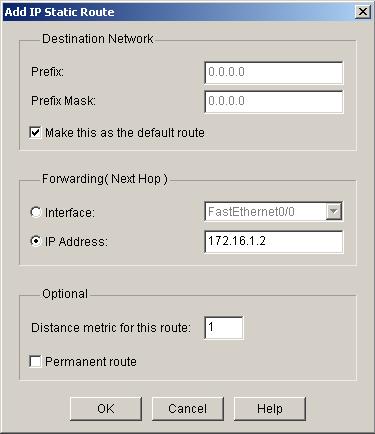
Click on the Add button, to add a static route. In the window that pops-up, check the “Make this as the default route” checkbox, which will populate the prefix and the prefix masks with 0.0.0.0, which denotes that is a default route. Next, specify the IP address of the next-hop router, also known in PC terms as the default gateway. In our case, the next-hop router is 172.16.1.1. Now, we’re ready to go.
Click on the Add button, to add a static route. In the window that pops-up, check the “Make this as the default route” checkbox, which will populate the prefix and the prefix masks with 0.0.0.0, which denotes that is a default route. Next, specify the IP address of the next-hop router, also known in PC terms as the default gateway. In our case, the next-hop router is 172.16.1.1. Now, we’re ready to go.

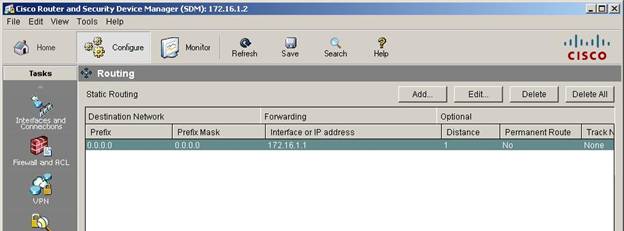
The default route has been added to your router.

If you are wondering what would take for a network administrator to configure this for the CLI, the equivalent command that must be entered is:
Router(config)#ip route 0.0.0.0 0.0.0.0 172.16.1.1
Router(config)#ip route 0.0.0.0 0.0.0.0 172.16.1.1
As you can see, using Cisco SDM is easy and can save you some time when you configure your router. Once you have configured your router to be able to use SDM, many configuration tasks that may take some of your important time, can be done faster if you use Cisco SDM, some faster via the command line tools. When you take the CCNA exam, you must have at least a basic understanding and be able to use the Cisco SDM tool.
