Cisco CCNA Dynamic NAT Configuration
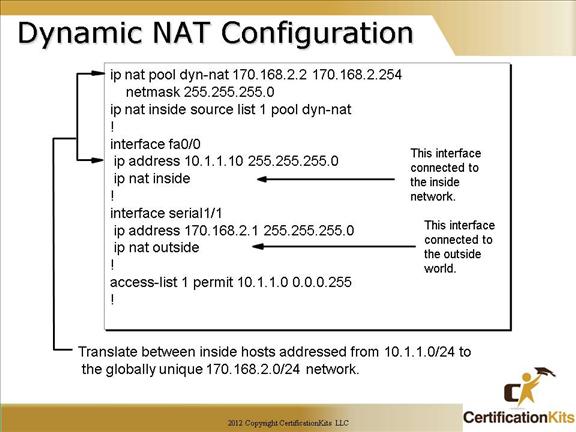
Dynamic NAT requires us to build a pool of address that will be used as Inside Global IPs that will be distributed to host that originate on interfaces labeled as IP NAT inside interfaces.
The “ip nat inside source list 1 pool dyn-nat” command here tells the router to translate ip addresses that match access-list 1 to an address found in the ip nat pool named dyn-nat.
The “ip nat pool dyn-nat 170.168.2.2 170.168.2.254” command creates a pool of addresses that will be distributed to those host that require NAT.
Again, the “ip nat inside” command identifies that interface as an inside source. The “ip nat outside” command identifies that interface as an outside source. The “ip nat inside” and “ip nat outside” commands are configured under the respective inside and outside facing interfaces.
Cisco CCNA Inside Global Address Overloading
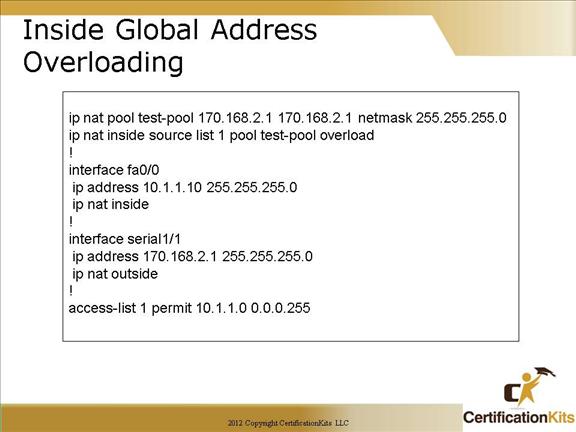
This example describes how to configure inside global address overloading by creating a NAT pool called “test-pool”. The only difference with this configuration and the previous configuration is that our pool of addresses has shrunk to only 1 IP address, and at the end of our “ip nat inside source” command we included the overload command.
Cisco CCNA Configuring NAT to Translate overlapping Addresses
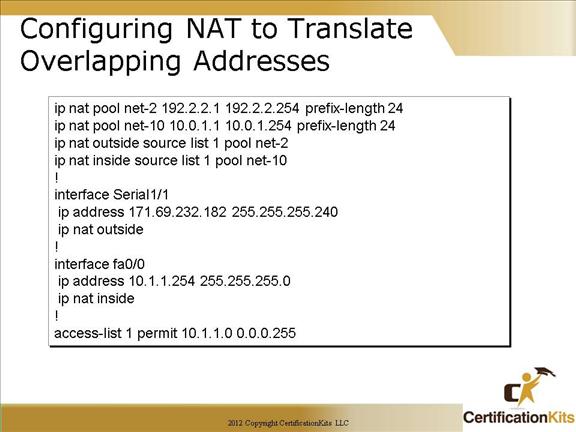
This figure describes how to configure NAT to translate overlapping addresses. Two pools are created, “net-2” which defines the outside (global pool) and “net-10” which defines the inside (local pool). Both specify a prefix-length of 24 which indicates a 24 bit mask.
Cisco CCNA Verify NAT
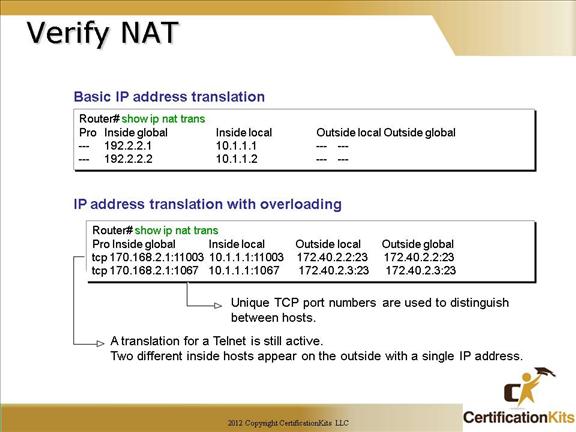
The upper output box displays a typical NAT table. The lower output box displays a NAT table with overloading.
When looking at the IP NAT translations, you may see many translations from the same host to the same host at the destination. This is typical of many connections to the Web. In the example output on the lower box this just indicates that there are two unique telnet (port 23) sessions between the same source and destination. The sessions are unique based on the source port number being different on each session.
Cisco CCNA Troubleshoot NAT
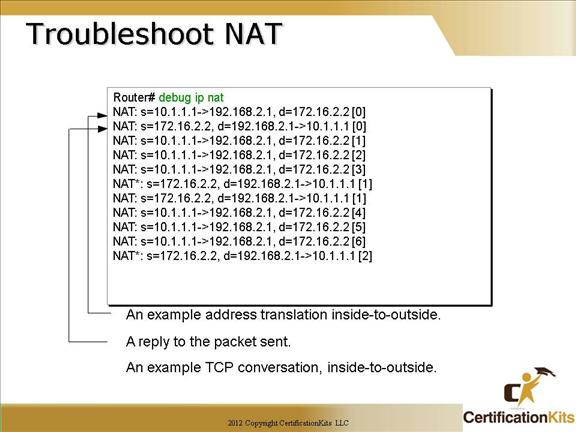
To verify your NAT configuration you can use the “debug ip nat” command. This output will show the sending address, the translation, and the destination address on each debug line. Study the output to get familiar with the translation. Remember when debugging on a production network it can be very CPU intensive and could adversely impact traffic to use with caution.
Cisco CCNA Clearing NAT entries
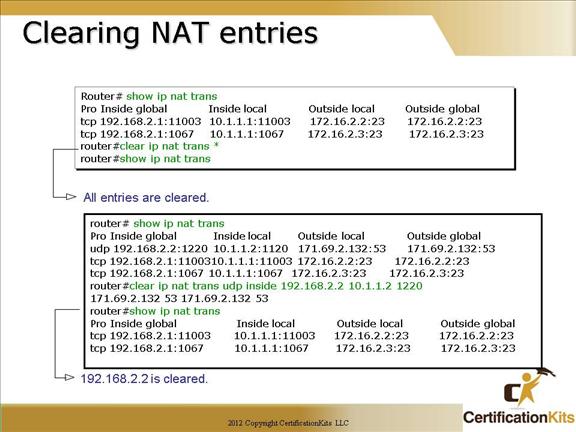
How do we clear your NAT entries from the translation table? Use the “clear ip nat translation” command. The “*” clears all entries from the NAT table. As depicted in the lower box, you can specify a unique entry to clear rather than clearing all NAT translation. Both output boxes in the figure show how the NAT table looks before and after the respective translations are cleared.
Cisco CCNA NAT Design

The NAT configuration would be placed on the Corporate router.
The configuration would be NAT overload (PAT).
NAT with overload (PAT) is required to allow the numerous hosts connected to the Engineering and Sales LAN with only four public IP addresses available.
Cisco CCNA NAT Scenario
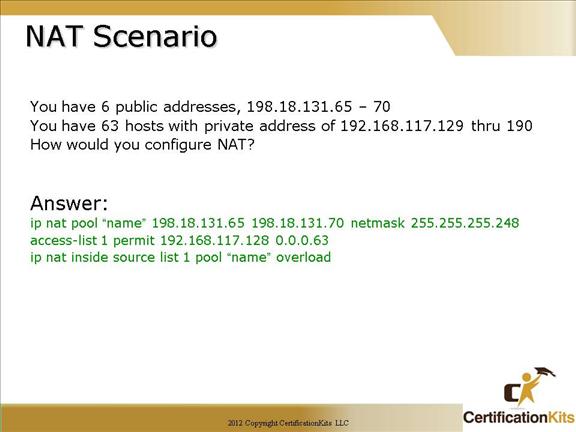
ip nat pool “name” 198.18.131.65 198.18.131.70 netmask 255.255.255.248
Note: You can also use the prefix-length 29 statement in place of the netmask.
access-list 1 permit 192.168.117.128 0.0.0.63
Defines an access-list that includes addresses 192.168.117.128 through 192.168.117.190
ip nat inside source list 1 pool “name” overload
Assigns addresses defined in access-list 1 (192.168.117.128 through 192.168.117.190) to be translated to the six publically routable addresses (198.18.131.65 – 198.18.131.70). Note there are 63 private addresses and only 5 publically routable addresses, hence the need for the “overload” option.
Remember to complete the configuration, the “ip nat inside” and “ip nat outside” statements must be applied on the appropriate interfaces.
Cisco CCNA Chapter 8 Summary
